Friday, July 19, 2019

Basic Table Terrain

In addition to jungle terrain, I need the usual assortment table top terrain of hills, etc that could work with most any scale.  I used polystyrene to make the basic shapes.  I used a hotwire cutter to shape the foam.  For the crags and rocky edges I used sandpaper to slice vertical and horizontal cuts.  I painted dirt and rocky areas, as painted the entire rest of the base a medium dark brown with craft paint to ensure any area not covered or thinly covered with turf wouldn't show blue foam through it.  I then used diluted Woodland Scenics (WS) scenic glue, approx. 1 part glue to 3-4 parts water and painted it on nice and watery and then sprinkled on some light colored blended turf earth blend in smaller patches, then covered the rest of the area with green blend.  This was pretty messes with the watery glue dripping off.  Once dried, I used the WS scenic cement, which seems to be a heavier dilution of glue, in a spray bottle and resprayed the surface of the terrain to fully adhere the turf.  Once dry it was ready to go.


Jungle Terrain Project

My ongoing quest to eventually host WWII South Pacific and Southeast Asia theaters battles had necessitated my creating jungle terrain.  After watching some good UTube vids of the Terrain Tutor, I delved into getting started.  First you need several supplies... I used Masonite for the bases, polystyrene foam insulation, assorted plastic plants from either fish supplies or from local craft store, plastic palm trees and bamboo, craft paint, hot glue gun, Woodland Scenics (WS) scenic glue and WS scenic cement, which is just pre-watered down scenic glue, and finally a bowl of expired herb spices (basil, oregano, other Italian spices), from the kitchen cabinet.  The latter gives a great scent to the terrain.
I cut the bases to assorted shapes on a bandsaw and beveled the edges with a grinding wheel.  I cut pieces of the polystyrene to fit as needed on the bases as raised plant beds for either individual or small groups of plants, or in longer strips and glued them in with wood glue. 


I used hot glue gun to attach the plastic plants to the polystyrene as I read that regular PVA glues were not good for adhesion of the plastic the plants were made from.  I then painted the bases with brown craft paint.  Once plants were mounted then I could use the scenic glue diluted roughly 50/50 spread across the bases and under the plants to then put on the herb ground cover.  On a couple bases, I put the ground cover on before the plants, and poked holes through the ground cover into the foam and mounted bamboo to make bamboo groves.


Saturday, March 23, 2019

And Now for Something Completely Different... Space Marines!

Going even further out in a different direction from WWII, I had a small squad of these Space Marines engineers that I've had for many many many etc. years (possibly since the mid 80's? That or 1990).  Finally got up my gumption to paint these.  After some research on how I wanted to go, I think they turned out pretty decent.  A bit more bold and solid in color than most of my painting.  Cant wait to get these into something.  These are my wife's favorites.


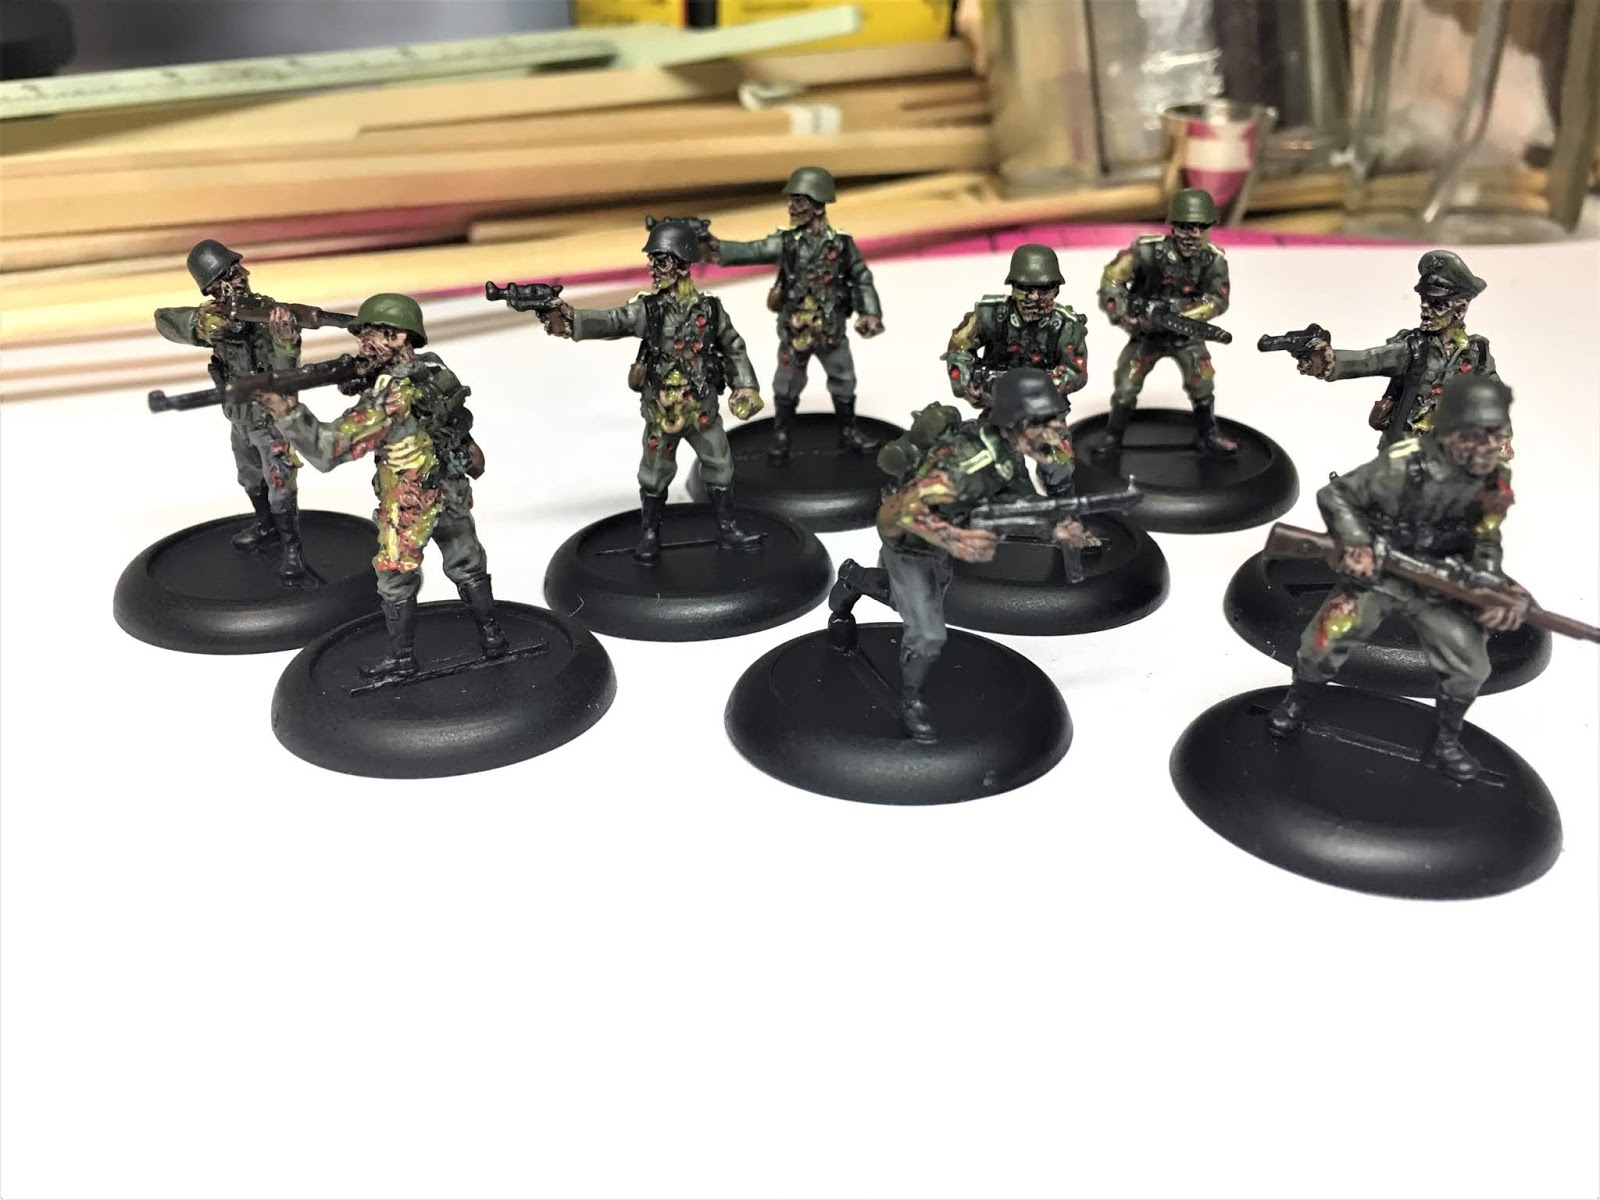
German Zombie Soldiers WWII

Well here's a bit of a drift right... I had bought some Reaper Chronoscope German WWII Zombies unt Reaper Reich of the Dead German Kroid Zombies.  I figured these could be used for some weird war scenarios involving hideous experimental soldiers for the allies to encounter.  Sometimes fun to have an unexpected twist, ya!  I added a bit of Citadel Nurgles Rot for some added gooey gore.  They did a nice job of sculpting to show exposed bone, and slouching intestine.


British Commandos WWII Europe

Getting away from the WWII Pacific theater, I have some British Commandos and SAS/Airborne squads.  The commando's are done, and nearing completion on the SAS/Airborne squads.  They're taking a bit longer due to the camo-smocks they are wearing.  The commando's actually might be a little more detailed due to the equipment they have on them... backpacks, and all the other gear that the airborne don't have on them.  It will be a nice addition for creating some European theater games. I enjoyed trying to get some enhanced detail for the tartan on the bagpiper's pipes bag, and the map.
Full Squad

Map reader and Piper

Sniper Team and other Observer


Australians for WWII Pacific

So now I have USMC, Chindits, and Japanese... What am I missing... of course Australians!!  I did up a squad of Australian Militia, and have a jungle division infantry team, command, MMG team, and Flamethrower, mortar, and sniper teams waiting in the wings to be painted.  Below is the Militia squad with commander.


Chindits for WWII Pacific

Ok, so along the same lines, I've been adding to my WWII line for Bolt Action.  I did up some Chindits for Jungle Play.  Again... I've just bought a good half dozen or more blisters packs full last September at a local con called RECRUITS in Lee's Summit, MO.  A couple Warlord dealers with a fairly decent selection and some minor discounts.

Medium and Light Mortar Teams, and Vickers MMG Team


Based so team casualties can be removed.  Something new I tried and liked.

AT-Rifle, PIAT, Flamethrower, Radio Teams

Always need some indigenous jungle guides!!

Russians: Updates

Gonna update a bit and do several shorter posts showing some of the new stuff I've finished up.  I've continued with my Russian WWII figs for Bolt Action.  Most figures are from Warlord Games except the Winter Rifle Squad and the NKVD Squad, who were by Battle Honors.  I've still got numerous squads and units in blister packs, bags, and some in the process of being painted.  So many... what have I done?


Command Team, Officers, Medic, Standard Bearer


Forward Observer Team
ZSU-23 Divisional Gun


Winter Rifle Squad

Anti-Tank and Flamethrower Teams

NKVD Squad


Assault Engineer Squad

Naval Infantry Squad

120mm Heavy Mortar Team
82mm Medium Mortar Team
Light Mortar Team


Monday, June 11, 2018

TRASH into TREASURE:  The Mountain Fortress

I’m always scrounging/saving something from the trash with the intent of transforming it or incorporating it into a gaming project.  Bits of used sprue, the clear contact lens packets (for windows), Styrofoam or polystyrene (for terrain or buildings), can lids (for basing groups of figs), or any other general crap that catches my eye.  Of course, this always draws a shake of the head from the Mrs. and a look on her face that says ‘Really? What are you going to do with that?  My sad sweet little man’.  As with all gamers or hobbyist, I think it’s about using a little imagination and creativity, plus a healthy desire to save some money here and there… prefab terrain, etc, isn’t cheap.
My latest find came while driving around during the city’s spring cleanup (any and all trash to the curb for pickup… no questions) looking for old used furniture for the Mrs. to refurbish (see dear, you do it too!!!).  Anyway, my Spidey sense was tingling as I drove past a box and immediately backed up to get a better look at what my eyes had spied.  In the box I find a brown plastic mountain thingy with a crane claw on top, mixed in with some Hot Wheels track.  I grabbed the mountain, and ditched the track.  The mountain thingy turns out to be from the Fisher-Price Geo Trax Mountain Blast Construction Quarry set from 2003.


I got it home and immediately began tearing off the crane/claw, shaving the tabs that hold the top to the bottom (now they just act as guides while allowing easy removal of the top if you want to put stuff inside), and removing a few other unnecessary bits.  I then washed it to get whatever child spit and coodies off that might be on it, which foreseeably might lead to disease, pestilence, and early death.  Children… Gods little petri-dishes!  I glued in some thin card stock over certain area to hide holes and make spots for figures to sit.  I sprayed on a coat of black spray primer, followed by a very light misting coat of brown.  I wet-brushed on a medium dark gray, followed by some lighter gray to highlight.  This was followed with moss flock (adds a pleasant smell as well), and then some turf grass in areas.  Finally, I glued the base to a cut-to-fit piece of brown Masonite, textured side up, which I can add additional grass, brush, weeds, etc to, and which will make it easier to pick up and hold too.  I’d like to create a couple interchangeable things, depending on the scenario, for the top of the mountain, ie. gun emplacement, radio tower, observation post, ray gun, etc.


It’s now set for use with any jungle, woodland, mountainous, or mysterious island, war gaming scenarios.  It’s not super high, which is ideal for storage and perspective, but has several levels, hidey-holes, and interior that can be used.  I foresee its use for some WWII Pacific Island scenarios, ie Peleliu, where the Marines had to assault fortified and entrenched Japanese defenders.


I added ground covering, which smelled great as it was made up of outdated herbs and spices from the kitchen cabinets.  It looks like a good jungle floor of old leaves and stuff.  I also used it on my jungle terrain bases.

Next Up… Scratch built tropical pacific huts and Guard Towers